Installation
This section covers the necessary steps to install and run PyMVPA. It contains a comprehensive list of software dependencies, as well as recommendation for additional software packages that further enhance the functionality provided by PyMVPA.
If you don’t want to read this whole document, and you are on a Debian-based system, such as Ubuntu, all you need to know it:
sudo aptitude install python-mvpa2
Dependencies
PyMVPA is designed to be able to easily interface with various libraries and computing environments. However, most of these external software packages only enhance functionality built into PyMVPA or add a different flavor of some algorithm (e.g. yet another classifier). In fact, the framework itself has only two mandatory dependencies (see below), which are known to be very portable. It is therefore possible to run PyMVPA on a wide variety of platforms and operating systems, ranging from computing mainframes, to regular desktop machines. It even runs on a cell phone.
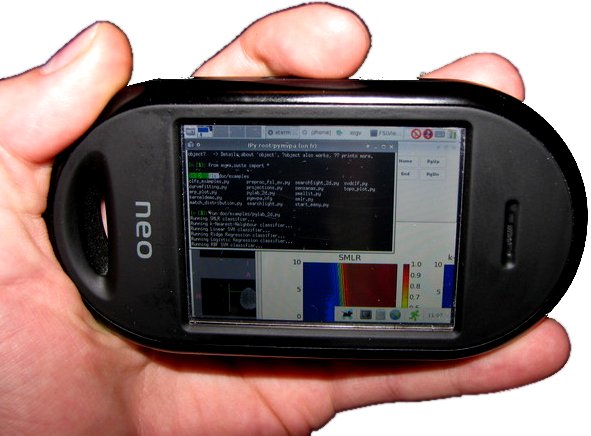
This picture shows PyMVPA on an OpenMoko cell phone — running the
pylab_2d.py example in an IPython session.
Note
In general a phone might not be the optimal environment for data analysis with PyMVPA, but PyMVPA itself does not restrict the user’s choice of the platform to the usual suspects. (A highres image is available, if you want to double check. ;-)
Must Have
The following software packages are required or PyMVPA will not work at all.
- Python 2.x
- These days there should be little reason to use anything older than Python 2.7. However, if you are on a tight budget 2.6, or even 2.5 should work – maybe even 2.4 with (at least) ctypes 1.0.1. Python 3.X should work too, but none of the core developers are using it in production (yet), hence it should be considered as less tested.
- NumPy
- PyMVPA makes extensive use of NumPy to store and handle data. There is no way around it.
Strong Recommendations
While most parts of PyMVPA will work without any additional software, some functionality makes use (or can optionally make use) of external software packages. It is strongly recommended to install these packages as well, if they are available on a particular target platform.
- SciPy: linear algebra, standard distributions, signal processing, data IO
- SciPy is mainly used by the statistical testing, and some data transformation algorithms. However, the SciPy package provides a lot of functionality that might be relevant in the context of PyMVPA, e.g. IO support for Matlab .mat files.
- NiBabel: access to NIfTI and other neuroimaging file formats
- PyMVPA provides a convenient wrapper for datasets stored in the NIfTI format, that internally uses NiBabel. If you don’t need that, NiBabel is not necessary, but otherwise it makes it really easy to read from and write to NIfTI images. All dataset types dealing with NIfTI data will not be available without a functional NiBabel installation.
Suggestions
The following list of software is, again, not required by PyMVPA, but these packages provide additional functionality (e.g. classifiers implemented in external libraries) and might make life a lot easier by leading to more efficiency when using PyMVPA.
- IPython: frontend
- If you want to use PyMVPA interactively it is strongly recommend to use IPython. If you think: “Oh no, not another one, I already have to learn about PyMVPA.” please invest a tiny bit of time to watch the Five Minutes with IPython screencasts at showmedo.com, so at least you know what you are missing. In the context of cluster computing IPython is also the way to go.
- FSL: preprocessing and analysis of (f)MRI data
- PyMVPA provides some simple bindings to FSL output and filetypes (e.g. EV files, estimated motion correct parameters and MELODIC output directories). This makes it fairly easy to e.g. use FSL’s implementation of ICA for data reduction and proceed with analyzing the estimated ICs in PyMVPA.
- AFNI: preprocessing and analysis of (f)MRI data
- Similar to FSL, AFNI is a free package for processing (f)MRI data. Though its primary data file format is BRIK files, it has the ability to read and write NIFTI files, which easily integrate with PyMVPA.
- scikit-learn: large parts of its functionality
- PyMVPA can make use of pretty much any algorithm that implements the transformer or estimator and predictor API.
- Shogun: various classifiers
- PyMVPA currently can make use of several SVM implementations of the Shogun toolbox. It requires the modular python interface of Shogun to be installed. Any version from 0.6 on should work.
- LIBSVM: fast SVM classifier
- Only the C library is required and none of the Python bindings that are available on the upstream website. PyMVPA provides its own Python wrapper for LIBSVM which is a fork based on the one included in the LIBSVM package. Additionally the upstream LIBSVM distribution causes flooding of the console with a huge amount of debugging messages. Please see the Building from Source section for information on how to build an alternative version that does not have this problem. Since version 0.2.2, PyMVPA contains a minimal copy of LIBSVM in its source distribution.
- R and RPy: more classifiers
- Currently PyMVPA provides wrappers around LARS, ElasticNet, and GLMNet R libraries available from CRAN. On Debian-based machines you might like to install r-cran-* packages from cran2deb repository.
- matplotlib: Matlab-style plotting library for Python
- This is a very powerful plotting library that allows you to export into a large variety of raster and vector formats (e.g. SVG), and thus, is ideal to produce publication quality figures. The examples shipped with PyMVPA show a number of possibilities how to use matplotlib for data visualization.
Installing Binary Packages
The easiest way to obtain PyMVPA is to use pre-built binary packages. Currently we provide such packages for the Debian/Ubuntu family, additional installers are provided by contributors (see below). If there are no binary packages for your operating system or platform yet, you can build PyMVPA from source. Please refer to Building from Source for more information.
Note
If you have difficulties deploying PyMVPA or its dependencies, we recommend that you try the NeuroDebian virtual machine. With this virtual appliance you’ll be able to deploy a fully functional computing environment, including PyMVPA, in a matter of minutes on any operating system.
Debian
PyMVPA is available as an official Debian package (python-mvpa2 or
python-mvpa for the previous stable release). The documentation is provided
by the optional python-mvpa2-doc package. To install PyMVPA simply do:
sudo aptitude install python-mvpa2
Debian backports and inofficial Ubuntu packages
Backports for the current Debian stable release and binary packages for recent Ubuntu releases are available from a NeuroDebian Repository. Please refer to NeuroDebian for installation instructions.
Windows
There are a few Python distributions for Windows. In theory all of them should work equally well. Christoph Gohlke runs a repository of unofficial Windows binaries for various scientific Python packages, including PyMVPA, that could ease deploying a PyMVPA installation on Windows significantly.
First you need to download and install Python. Use the Python installer for
this job. Yo do not need to install the Python test suite and utility scripts.
From now on we will assume that Python was installed in C:\Python25 and that
this directory has been added to the PATH environment variable.
For a minimal installation of PyMVPA the only thing you need in addition is NumPy. Download a matching NumPy windows installer for your Python version (in this case 2.5) from the SciPy download page and install it.
Now, you can use the PyMVPA windows installer to install PyMVPA on your system.
If done, verify that everything went fine by opening a command prompt and start
Python by typing python and hit enter. Now you should see the Python prompt.
Import the mvpa module, which should cause no error messages.
>>> import mvpa2
>>>
Although you have a working installation already, most likely you want to install some additional software. First and foremost install SciPy – download from the same page where you also got the NumPy installer.
If you want to use PyMVPA to analyze fMRI datasets, you probably also want to
install NiBabel. Download the corresponding installer from the website of the
and install it. Verify that it works by importing the nibabel module in Python.
>>> import nibabel
>>>
Another piece of software you might want to install is matplotlib. The project
website offers a binary installer for Windows. If you are using the standard
Python distribution and matplotlib complains about a missing msvcp71.dll, be
sure to obey the installation instructions for Windows on the matplotlib
website.
With this set of packages you should be able to run most of the PyMVPA examples
which are shipped with the source code in the doc/examples directory.
MacOS X
The easiest installation method for OSX is via MacPorts. MacPorts is a package management system for MacOS, which is in some respects very similiar to RPM or APT which are used in most GNU/Linux distributions. However, rather than installing binary packages, it compiles software from source on the target machine.
The MacPort of PyMVPA is kindly maintained by James Kyle <jameskyle@ucla.edu>.
Note
MacPorts needs XCode developer tools to be installed first, as the operating system does not come with a compiler by default.
In the context of PyMVPA MacPorts is much easier to handle than the previously available PyMVPA installer for Macs (which was discontinued with PyMVPA 0.4.1). Although the initial overhead to setup MacPorts on a machine is higher than simply installing PyMVPA using the former installer, MacPorts saves the user a significant amount of time (in the long run). This is due to the fact that this framework will not only take care of updating a PyMVPA installation automatically whenever a new release is available. It will also provide many of the optional dependencies of PyMVPA (e.g. NumPy, SciPy, matplotlib, IPython, Shogun, and pywt) in the same environment and therefore abolishes the need to manually check dozens of websites for updates and deal with an unbelievable number of different installation methods.
MacPorts provides a universal binary package installer that is downloadable at http://www.macports.org/install.php
After downloading, simply mount the dmg image and double click MacPorts.pkg.
By default, MacPorts installs to /opt/local. After the installation is
completed, you must ensure that your paths are set up correctly in order to
access the programs and utilities installed by MacPorts. For exhaustive details
on editing shell paths please see:
A typical bash_profile set up for MacPorts might look like:
> export PATH=/opt/local/bin:/opt/local/sbin:$PATH
Be sure to source your .bash_profile or close Terminal.app and reopen it for these changes to take effect.
Once MacPorts is installed and your environment is properly configured, PyMVPA is installed using a single command:
> $ sudo port install py27-pymvpa +scipy +nibabel +hcluster +libsvm
> +matplotlib +pywavelet
The +foo arguments add support within PyMVPA for these packages. For a full
list of available 3rd party packages please see:
> $ port variants py27-pymvpa
If this is your first time using MacPorts Python 2.7 will be automatically installed for you. However, an additional step might be needed:
$ sudo port select python python27-apple
MacPorts has the ability of installing several Python versions at a time, the
port select python command ensures that the default Python (located at
/opt/local/bin/python) points to your preferred version.
Upon success, open a terminal window and start Python by typing python and
hit return. Now try to import the PyMVPA module by doing:
>>> import mvpa2
>>>
If no error messages appear, you have succesfully installed PyMVPA.
Building from Source
If a binary package for your platform and operating system is provided, you do not have to build the packages on your own – use the corresponding pre-build packages instead. However, if there are no binary packages for your system, or you want to try a new (unreleased) version of PyMVPA, you can easily build PyMVPA on your own. Any recent GNU/Linux distribution should be capable of doing it (e.g. RedHat). Additionally, building PyMVPA also works on Mac OS X and Windows systems.
Obtain the Sources
Get the sources by cloning the Git repository on GitHub:
git clone git://github.com/PyMVPA/PyMVPA.git
After a short while you will have a PyMVPA directory below your current
working directory, that contains the PyMVPA repository.
If you are not familiar with Git or GitHub, visit the GitHub help pages for more information and tutorials.
Build it (General instructions)
In general you can build PyMVPA like any other Python module (using the Python distutils). This general method will be outline first. However, in some situations or on some platforms alternative ways of building PyMVPA might be more convenient – alternative approaches are listed at the end of this section.
To build PyMVPA from source simply enter the root of the source tree (obtained by either extracting the source package or cloning the repository) and run:
python setup.py build_ext
If you are using a Python version older than 2.5, you need to have python-ctypes (>= 1.0.1) installed to be able to do this.
Now, you are ready to install the package. Do this by invoking:
python setup.py install
Most likely you need superuser privileges for this step. If you want to install in a non-standard location, please take a look at the --prefix option. You also might want to consider --optimize.
Now you should be ready to use PyMVPA on your system.
Build with enabled LIBSVM bindings
From the 0.2 release of PyMVPA on, the LIBSVM classifier extension is not build by default anymore. However, it is still shipped with PyMVPA and can be enabled at build time. To be able to do this you need to have SWIG installed on your system.
If you do not have a proper LIBSVM package, you can build the library from the copy of the code that is shipped with PyMVPA. To do this, simply invoke:
make 3rd
Now build PyMVPA as described above. The build script will automatically detect that LIBSVM is available and builds the LIBSVM wrapper module for you.
If your system provides an appropriate LIBSVM version, you need to have the
development files (headers and library) installed. Depending on where you
installed them, it might be necessary to specify the full path to that location
with the --include-dirs, --library-dirs and --swig options. Now add the
‘–with-libsvm’ flag when building PyMVPA:
python setup.py build_ext --with-libsvm \
    [ -I<LIBSVM_INCLUDEDIR> -L<LIBSVM_LIBDIR> ]
The installation procedure is equivalent to the build setup without LIBSVM, except that the ‘–with–libsvm’ flag also has to be set when installing:
python setup.py install --with-libsvm
Alternative build procedure
Alternatively, if you are doing development in PyMVPA or if you
simply do not want (or do not have sufficient permissions to do so) to
install PyMVPA system wide, you can simply call make (same as make
build) in the top-level directory of the source tree to build
PyMVPA. Then extend or define your environment variable PYTHONPATH
to point to the root of PyMVPA sources (i.e. where you invoked all
previous commands from):
export PYTHONPATH=$PWD
Note
This procedure also always builds the LIBSVM extension and therefore also requires LIBSVM and SWIG to be available.
Windows
On Windows the whole situation is a little more tricky, as the system doesn’t come with a compiler by default. Nevertheless, it is possible to build PyMVPA from source. One could use the Microsoft compiler that comes with Visual Studio to do it, but as this is commercial software and not everybody has access to it, we will outline a way that exclusively involves free and open source software.
First one needs to install the packages required to run PyMVPA as explained above.
Next we need to obtain and install the MinGW compiler collection. Download the
Automated MinGW Installer from the MinGW project website. Now, run it and
choose to install the current package. You will need the MinGW base tools,
g++ compiler and MinGW Make. For the remaining parts of the section, we
will assume that MinGW got installed in C:\MinGW and the directory
C:\MinGW\bin has been added to the PATH environment variable, to be able
to easily access all MinGW tools.
Note
It is not necessary to install MSYS to build PyMVPA, but it might handy to have it.
If you want to build the LIBSVM wrapper for PyMVPA, you also need to download
SWIG (actually swigwin, the distribution for Windows). SWIG does not have to
be installed, just unzip the file you downloaded and add the root directory of
the extracted sources to the PATH environment variable (make sure that this
directory contains swig.exe, if not, you haven’t downloaded swigwin).
PyMVPA comes with a specific build setup configuration for Windows –
setup.cfg.win in the root of the source tarball. Please rename this file to
setup.cfg. This is only necessary, if you have not configured your Python
distutils installation to always use MinGW instead of the Microsoft compilers.
Now, we are ready to build PyMVPA. The easiest way to do this, is to make use
of the Makefile.win that is shipped with PyMVPA to build a binary installer
package (exe). Make sure, that the settings at the top of Makefile.win
(the file is located in the root directory of the source distribution)
correspond to your Python installation – if not, first adjust them accordingly
before your proceed. When everything is set, do:
mingw32-make -f Makefile.win installer
Upon success you can find the installer in the dist subdirectory. Install it
as described above.
OpenSUSE
Building PyMVPA on OpenSUSE involves the following steps (tested with 10.3): First add the OpenSUSE science repository, that contains most of the required packages (e.g. NumPy, SciPy, matplotlib), to the Yast configuration. The URL for OpenSUSE 10.3 is:
http://download.opensuse.org/repositories/science/openSUSE_10.3/
Now, install the following required packages:
- a recent C and C++ compiler (e.g. GCC 4.1)
python-devel(Python development package)python-numpy(NumPy)swig(SWIG is only necessary, if you want to make use of LIBSVM)
Now you can simply compile and install PyMVPA, as outlined above, in the general build instructions (or alternatively using the method with LIBSVM).
If you want to run the PyMVPA examples including the ones that make use of the
plotting capabilities of matplotlib you need to install of few more packages
(mostly due to broken dependencies in the corresponding OpenSUSE packages):
python-scipypython-gobject2python-gtk
Fedora
On Fedora (tested with Fedora 9) you first have to install a few required packages, that are not installed by default. Simply do:
yum install numpy gcc gcc-c++ python-devel swig
You might also want to consider installing some more packages, that will make your life significantly easier:
yum install scipy ipython python-matplotlib
Now, you are ready to compile and install PyMVPA as describe in the general build instructions.
MacOS X
Since the MacPorts system basically compiles from source there should be no need to perform this step manually. However, if one intends to compile without MacPorts the XCode developer tools, have to be installed first, as the operating system does not come with a compiler by default. If you want to use or even work on the latest development code, you should also install Git. There is a MacOS installer for Git, that make this step very easy.
Otherwise follow the general build instructions.

